
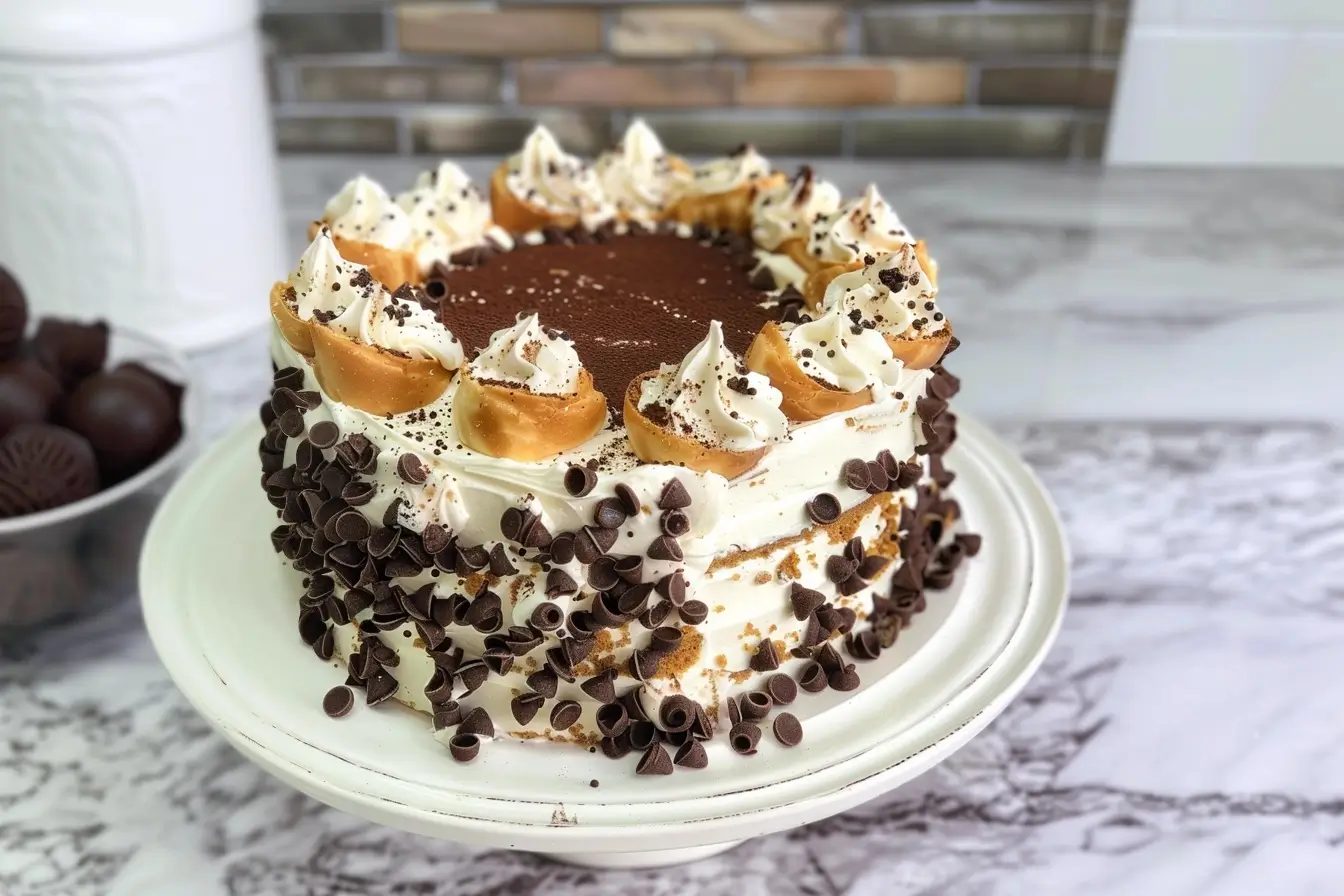
If you’re a fan of classic Italian desserts, this Layered Cannoli Cake is sure to become a favorite. Combining the rich flavors of a traditional cannoli with the soft, fluffy texture of a homemade cake, this dessert is a delightful fusion of two beloved treats. Perfect for special occasions or whenever you’re craving something sweet and indulgent, this cake is a showstopper that will impress your guests. Plus, it’s easier to make than you might think!
Ingredients You’ll Need
For the Cake:
- 1 1/2 cups all-purpose flour
- 1 1/2 tsp baking powder
- 1/2 tsp salt
- 1/2 cup unsalted butter, room temperature
- 1 cup granulated sugar
- 3 large eggs
- 1 tsp vanilla extract
- 3/4 cup whole milk
For the Ricotta Filling:
- 2 cups ricotta cheese
- 1 cup powdered sugar
- 1 tsp cinnamon
- 1/2 cup mini chocolate chips
For the Whipped Cream:
- 1/2 cup heavy cream
Step-by-Step Instructions
Step 1: Preheat Your Oven
Start by preheating your oven to 350°F (175°C). Grease and flour two 8-inch round cake pans to ensure the cakes don’t stick.
Step 2: Prepare the Dry Ingredients
In a medium bowl, whisk together 1 1/2 cups all-purpose flour, 1 1/2 tsp baking powder, and 1/2 tsp salt. Set this mixture aside; it will be added to the batter shortly.
Step 3: Cream the Butter and Sugar
In a large mixing bowl, beat 1/2 cup of softened unsalted butter and 1 cup of granulated sugar together until the mixture becomes light and fluffy. This process should take about 2-3 minutes.
Step 4: Incorporate the Eggs and Vanilla
Add the 3 large eggs to the butter mixture one at a time, beating well after each addition to fully incorporate. Once the eggs are mixed in, add 1 tsp vanilla extract and stir to combine.
Step 5: Combine the Wet and Dry Ingredients
Gradually add the dry ingredients to the butter mixture, alternating with 3/4 cup of whole milk. Begin and end with the dry ingredients. Mix until just combined, being careful not to overmix, as this can make the cake dense.
Step 6: Bake the Cake Layers
Divide the batter evenly between the prepared cake pans. Bake for 25-30 minutes or until a toothpick inserted into the center of the cakes comes out clean. Allow the cakes to cool in the pans for 10 minutes before transferring them to a wire rack to cool completely.
Step 7: Prepare the Ricotta Filling
In a medium bowl, combine 2 cups of ricotta cheese, 1 cup of powdered sugar, 1 tsp of cinnamon, and 1/2 cup of mini chocolate chips. Mix until smooth and well combined.
Step 8: Assemble the Cake
Place one cake layer on a serving plate. Spread half of the ricotta mixture evenly over the top. Place the second cake layer on top and spread the remaining ricotta mixture over it.
Step 9: Whip the Cream
In a chilled bowl, whip 1/2 cup of heavy cream until stiff peaks form. This step is crucial to achieving a light and fluffy topping.
Step 10: Finish and Garnish
Spread the whipped cream over the top and sides of the cake. For an extra touch, garnish with additional mini chocolate chips.
Serving and Storage Tips
- Serving: This Layered Cannoli Cake is best served chilled, allowing the ricotta filling to set and the flavors to meld together. Slice into 8-10 slices and serve with a cup of espresso for a true Italian experience.
- Storage: Store any leftovers in an airtight container in the refrigerator for up to 3 days. The whipped cream may lose some of its fluffiness over time, so it’s best enjoyed fresh.
Helpful Notes
- Room Temperature Ingredients: Ensure that your butter and eggs are at room temperature before starting the recipe. This will help the ingredients to mix more evenly, resulting in a smoother batter.
- Ricotta Quality: For the best results, use high-quality ricotta cheese. If the ricotta is too wet, strain it through a cheesecloth for a few hours to remove excess moisture.
- Chocolate Chips: If you prefer a more intense chocolate flavor, you can increase the amount of mini chocolate chips in the ricotta filling or even sprinkle some between the layers during assembly.
Tips from Well-Known Chefs
- Chef Michael Symon: Recommends adding a touch of orange zest to the ricotta filling for a burst of citrus flavor that complements the chocolate and cinnamon perfectly.
- Chef Giada De Laurentiis: Suggests toasting the mini chocolate chips slightly before adding them to the filling for an enhanced chocolatey crunch.
- Chef Lidia Bastianich: Advises using a cake ring when assembling the cake layers to ensure a perfectly even and professional-looking finish.
Frequently Asked Questions
Q1: Can I use a different type of cheese instead of ricotta?
- A1: While ricotta is traditional, you could substitute it with mascarpone for a creamier texture, but this will change the flavor slightly.
Q2: How can I make this cake gluten-free?
- A2: Substitute the all-purpose flour with a gluten-free flour blend that includes xanthan gum to maintain the cake’s structure.
Q3: What can I use if I don’t have mini chocolate chips?
- A3: You can chop regular-sized chocolate chips or even use finely chopped chocolate bars as an alternative.
Q4: Can I prepare this cake in advance?
- A4: Yes, you can bake the cake layers and prepare the ricotta filling up to a day in advance. Assemble the cake on the day you plan to serve it.
Q5: How do I prevent the cake from drying out?
- A5: Ensure that the cake layers are not overbaked. You can also brush the layers with a simple syrup for added moisture.
Q6: Can I add fruit to this cake?
- A6: Fresh berries or sliced fruit like strawberries or oranges can be added between the layers for a fresh twist.
Q7: What can I do if my whipped cream isn’t stiffening?
- A7: Make sure your bowl and beaters are chilled before whipping the cream. If that doesn’t work, add a tablespoon of powdered sugar to help stabilize it.
Q8: Can I freeze this cake?
- A8: It’s not recommended to freeze the cake as the ricotta filling and whipped cream may not retain their texture after thawing.
Q9: What kind of decorations can I add?
- A9: You can decorate with more mini chocolate chips, candied orange peel, or even a dusting of cocoa powder or powdered sugar.
Q10: Is this cake suitable for someone with a nut allergy?
- A10: Yes, the recipe as written does not contain nuts. Just ensure that any additional decorations or ingredients you add are nut-free.
With these detailed steps, tips, and FAQs, you’re well-equipped to create a stunning and delicious Layered Cannoli Cake that will delight your taste buds and impress your guests. Enjoy baking!